The following post was originally written by Octavian Naicu, Founder & Product Manager at Pipe.
This tutorial will show you how to easily create a Alchemer survey that gathers qualitative data using recorded video answers.
With qualitative surveys one asks for comments, feedback, suggestions, and other kinds of responses that can’t be easily classified.
If almost by definition the gathered data is open ended – and thus the richer the response data the better the results – then what better way to gather and interpret qualitative data at scale than with the respondents answering your open ended questions on video?
With most of the emotion being communicated in nonverbal ways, think how much depth and data you’ll be gathering compared to text based responses. Videos will not only capture the spoken content but also facial expressions, changes in tone and inflections in their voice, and body language.
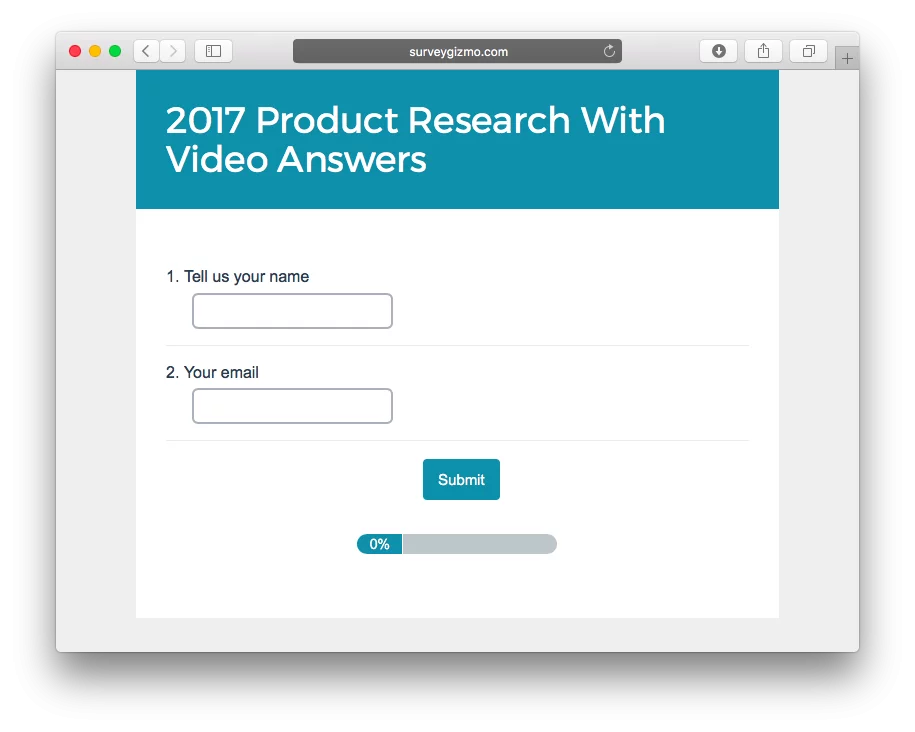
1. Create a New Survey
Log in to your Alchemer account and create a new survey. Give it a name and start building.
Add a new Question of type Textbox to request the name of the user completing the survey and recording the video. Add a new question of type Email to collect the email as well.
Here’s how our survey looks so far:
2. Add The Video Recorder
In Alchemer’s build interface:
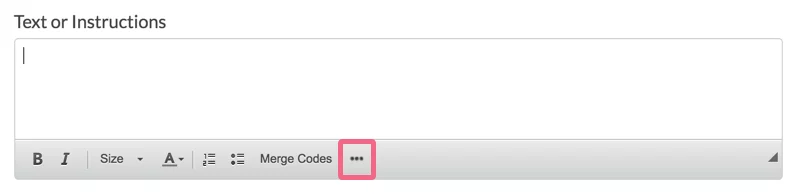
- Add a new Text/Media element
- Click on the Text or Instructions field that shows up
- Click on the 3 dots icon
:
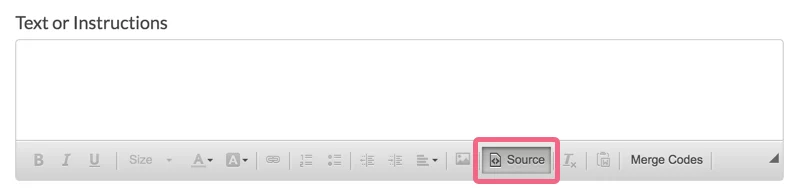
- Then click on Source
:
- Add some instructional text here, for example “Record Your Video Below”.
- Below your instructional text, paste the following HTML code: <div id=”hdfvr-content”> </div>. Your text element should look similar to this:
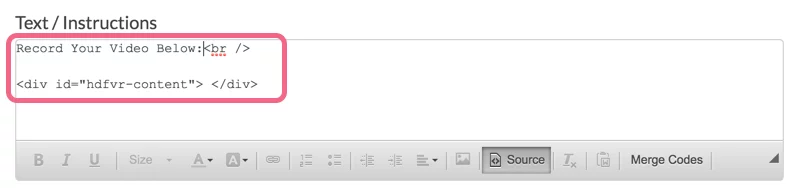
- Click the Save button at the bottom right.
- Next, create a JavaScript Action directly below your text element. Give it a meaningful title, ex. Pipe Video Recorder.
- You will need to paste a portion of the Pipe embed code (you can get it from your Pipe account from the Embed Video Recorder tab) into the JavaScript Action. Copy everything between the opening <script type…> tag and the closing </script> tag, and paste it into the JavaScript Action. It should look like this:

- Make sure to Save your action.
Your survey should now contain a video recorder:
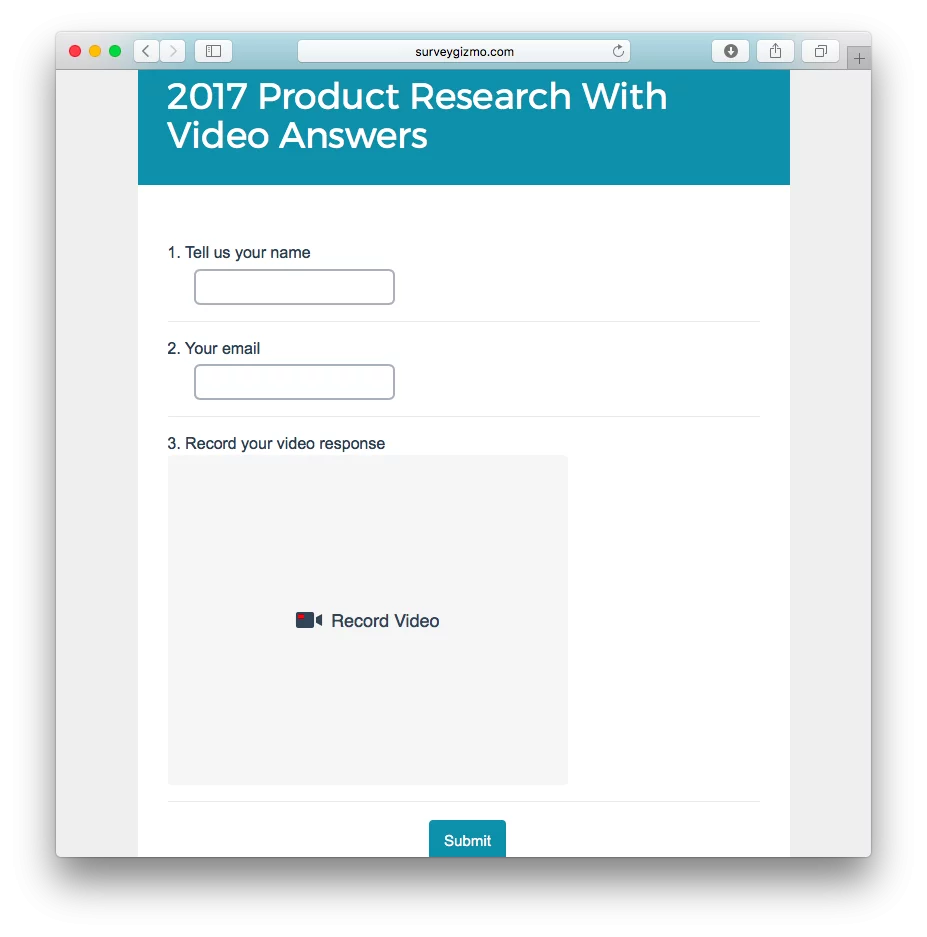
Respondents will now be able to type in their name, email, and record a video response using their webcam, to be submitted together with the survey. Now we just have to link the recorded video to the response.
3. Add a (Hidden) Video URL Field
This is where we’ll use Alchemer’s Hidden Value feature (available only with the Standard plan or above). The hidden value will store the video URL when the survey is submitted.
From Alchemer’s build interface:
- Add a Hidden Value from the Add New: Action side menu
- Give it a name (I used “Video URL”) and save
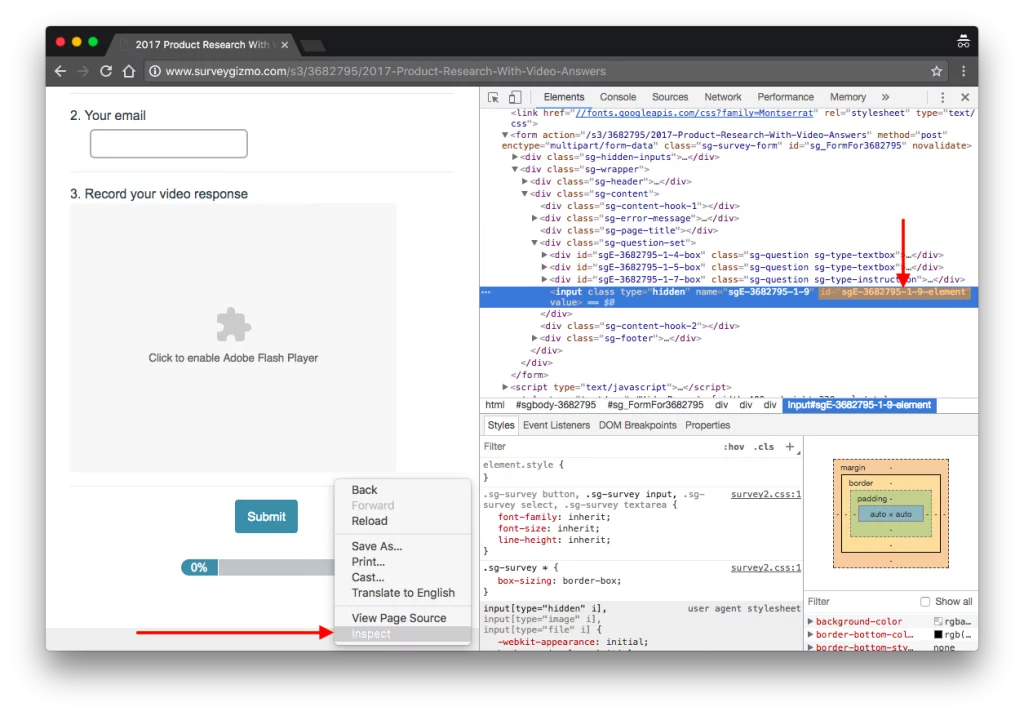
Now we need to find out the HTML ID of the new hidden value. I found no easier way to do it than inspecting the survey’s HTML code using Chrome’s Developer tools (right click > Inspect) and identifying the hidden input and it’s id:
4. Fill the Video URL with The Actual URL
We’ll use Pipe’s onSaveOk JS function (part of Pipe’s Java Script Desktop Events API) which gives us the name and location of the final mp4 video. We’ll use this info to generate the full URL.
The onSaveOk function is called by Pipe after a video is recorded and gives us a lot of information about the new video including:
- Video name (without extension)
- Duration, audio and video codecs
- Device names (camera, microphones) if available
- Location of the final video and snapshot (if stored by us)
We’ll be extending onSaveOk to:
- Generate the absolute URL, including the extension, using the video name and its location.
- Populate the hidden video URL field with the actual URL.
To make it work on mobile devices we’ll also be using Pipe’s onVideoUploadSuccess function (part of Pipe’s Java Script Mobile Events API).
From Alchemer’s build interface:
- Edit the JavaScript Action where you previously pasted your Pipe video embed code.
- Paste the code below in the JS field after replacing the accountHash and formFieldId values with the real ones
accountHash=”ACCOUNT_HASH“;
formFieldId=”FORM_FIELD_ID“;
function onSaveOk(streamName, streamDuration, userId, cameraName, micName, recorderId, audioCodec, videoCodec, fileType, videoId, audioOnly, location){
//onSaveOK is part of the JS desktop events API
document.getElementById(formFieldId).value = “https://”+location+”/”+accountHash+”/”+streamName+”.mp4″;
}
function onVideoUploadSuccess(filename, filetype, videoId, audioOnly, location){
//onVideoUploadSuccess is part of the JS mobile events API
document.getElementById(formFieldId).value = “https://”+location+”/”+accountHash+”/”+filename+”.mp4″;
}
3. Your finished code should look like this:
3. Click on Save Action
The formFieldId value is the id identified in step 3 above.
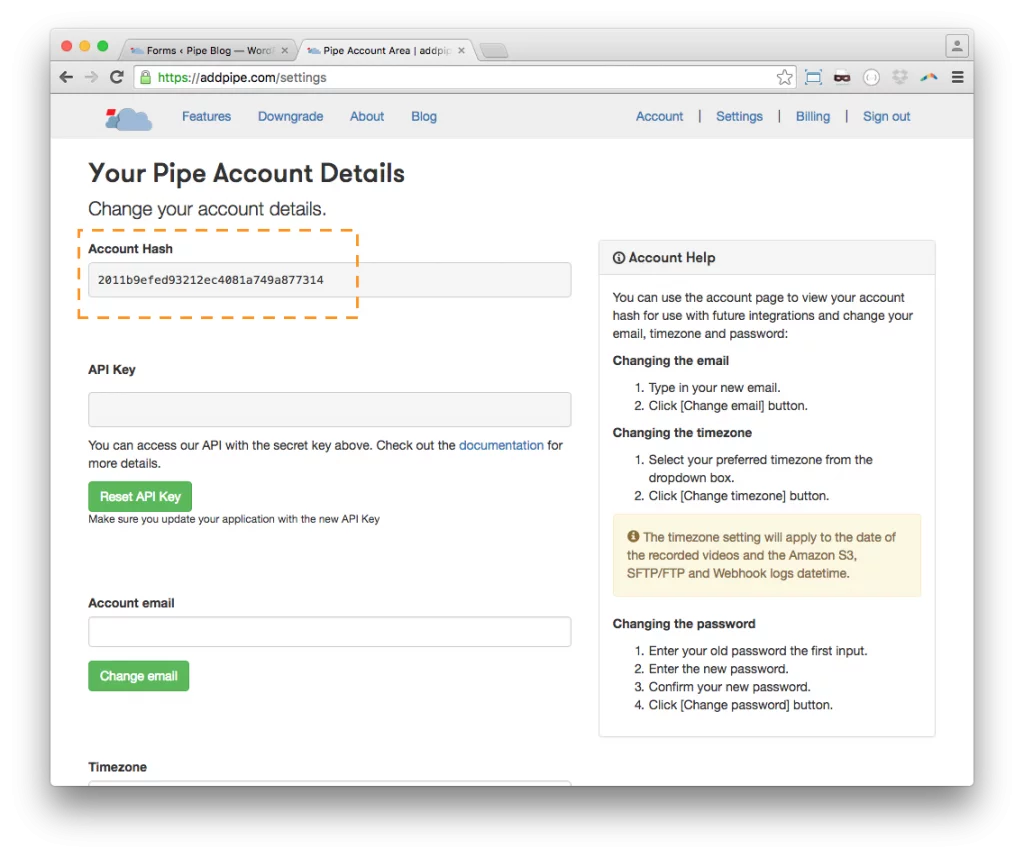
The accountHash value can be found in your Pipe Account > Settings page:
And… You’re Done!
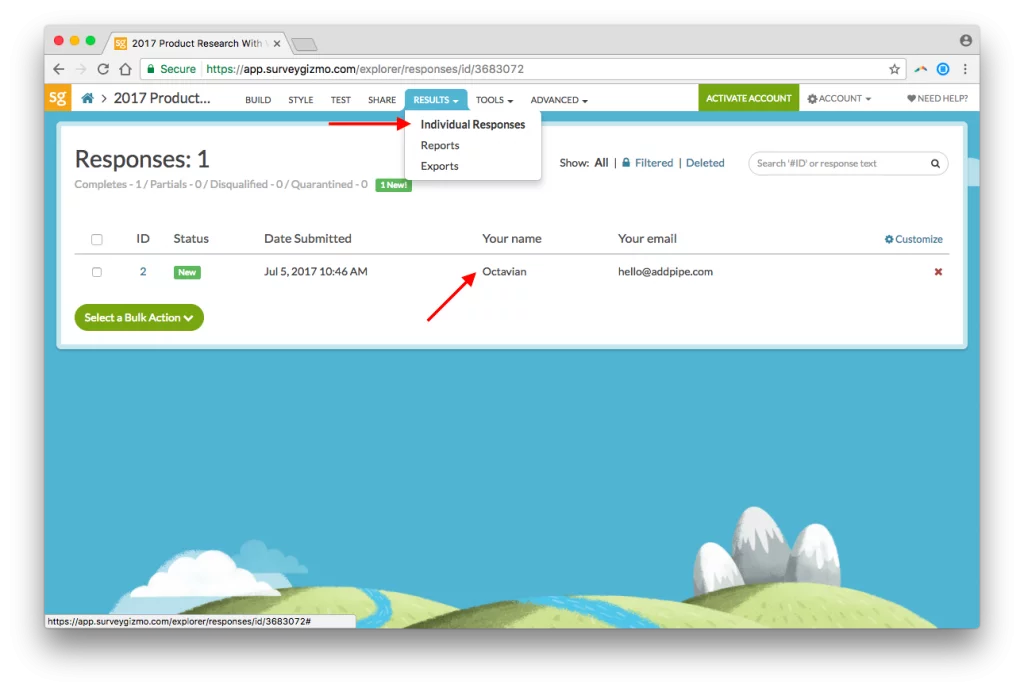
All survey responses will now contain the URL to the recorded video. In your Alchemer backend, clicking on Results > Individual Responses will bring up the list of responses:
Clicking on each response will bring up all the details including the Video URL:
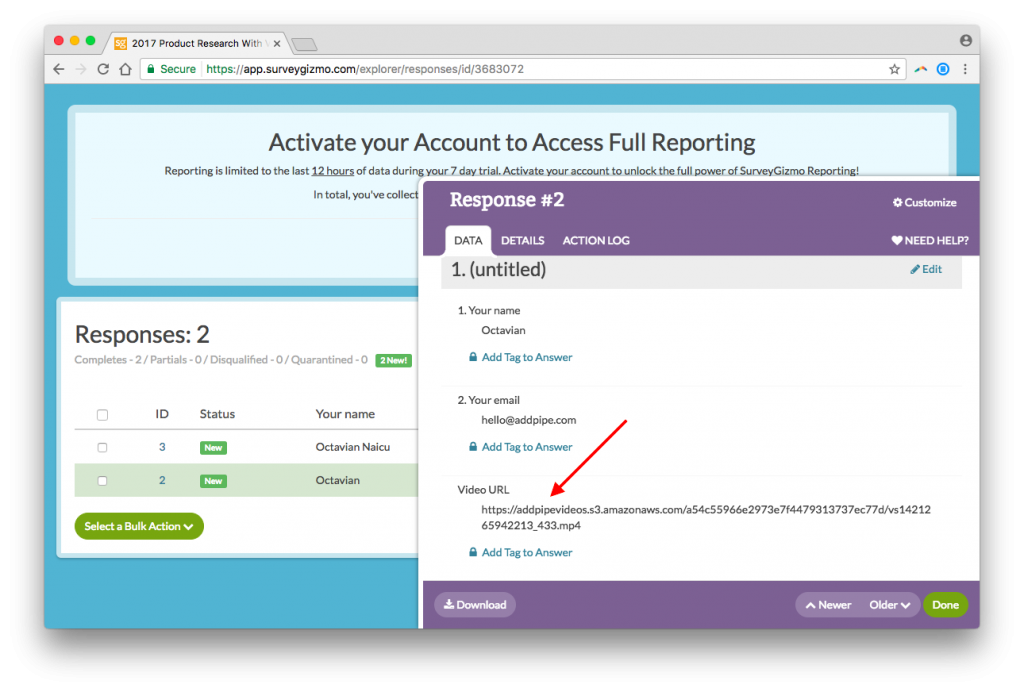
You can also configure the the list of responses to show the Video URL for each vid by clicking on Customize in the top right.